
Lighting For Black & White
- Mike Kozlenko

- Aug 19, 2019
- 10 min read
Updated: Mar 23, 2022
A look into a fun little music performance video I shot for Midland in June

I’m sitting here in the New Orleans airport in an awkwardly long 5-hour layover with nothing better to do than to write a silly blog about a cool project I was lucky enough to shoot about 2 months ago. I was hoping to do a writeup earlier but then for some reason I got crazy busy with tons of shoots. This project in particular came about in such a funny way. Here's the finished piece:
Getting the Call + Prep
On a random Monday in June, I was shooting a shitty internet gig with a DSLR, 1-man-band style. Interviews + B-roll. People say summer can be slow in production-land here in Austin so sometimes you have to eat a shit-sandwhich & take these kinds of jobs. After drinking my sorrows away that evening, I get an Instagram message from Caster Studios as I’m about to fall asleep. I had never heard of this production company and their IG page didn’t have many posts, but it did have enough info to suggest they were new in town.
IG message from random prod company on a Monday night: “Hey do you want to shoot a music video this Wednesday?”
Me: “Sure”
So less than 24 hours to prepare for a music video. I had no idea what the location, crew, equipment, or music was. Never spoke with the director. This gig got tossed to Caster Studios last minute so we were all in the same boat. Here goes nothing…
The next day we scouted the location & I got some clarity on the creative. We were doing a moody black & white performance video (not a live one) in a recording studio called Congress House Studio. Location scout photos below:


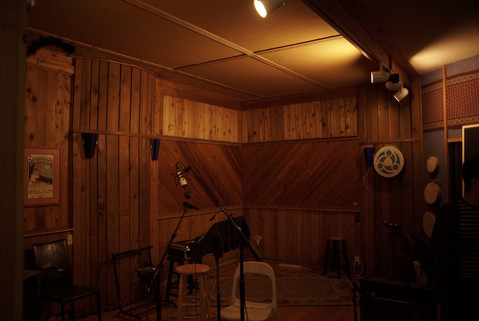
The space turned out to be pretty small. A DP's favorite (not)... It had 2 main areas: The beautiful wooden-walled area and the shittier-looking area with a window, drums, a rug on the wall, & some other miscellaneous studio shit. It fit the vibe though. To get visual variety, I knew we'd have to utilize both areas. After hearing the song I figured getting a steadicam would be our best bet to capture the spirit of the song: slow, smooth, harmonious, etc. The director wanted it to feel a little gritty, dark, & vintage & we were just going to do basic performance coverage with a few special shots peppered in.
I also found out about another unique complication: The band was actually recording an entirely DIFFERENT song that SAME DAY of the shoot for their new album, so they'd be using the studio all day. This meant that in the morning we had 1.5-2 hours to light the space, then get outta there & wait for the band to record their song, then film the music video with what surely would be an exhausted band. So we'd need to have very short setup times between takes. So we sat on our butts & waited & did nothing for about 5-6 hours til they finished recording, & then we started rolling camera. Cool.
So the parameters for the shoot were set, but we were less than 12 hours from call time and had no crew or equipment package reserved. The producer Nick, got a Red Epic Dragon & Arri Master Primes on hold. But the Master Primes were too clean, sharp, & modern for this video. So instead we got our hands on some beautiful Zeiss Standard Speeds. They vignetted on the 6k Dragon which was annoying but we shot 5K so it worked out.
I got my buddy Ari to 1st AC. We still had no G&E crew though. Sent a few texts & managed to get Dan Leonard booked as gaffer, who ended up being awesome on set. But it turned out the 1-ton truck we were going to get wasn't available, and I was still in search of a key grip. Well John Rains, a producer & owner of Backstory came in clutch. He rented his 1-ton trailer, and came out to key grip. We got our hands on a few extra lamps, & ended up with a solid lighting package for what we were doing. We had to light with almost entirely overhead rigging since it was a small space & we needed ground space for steadicam. So having a Litemat S4, S2, Astera Titan Tubes, and a kit of Dedos REALLY helped.
The Approach
I'll preface all this by saying that I don't really know what I'm talking about most of the time and I could be wrong about how I approach or think about certain things related to light & camera, but for better or for worse, sometimes it yields acceptable results.
When lighting for black & white, there’s definitely a few considerations to take note of. I didn’t do any particular research on this, but my intuition told me that I needed to play very close attention to capturing tone & texture in the shadows of the image (not actual shadows but the darker areas in the frame). One thing I usually like to do is infuse a bit of color into those darker areas with very gentle & very soft pushes of coolness and/or warmth. With this project, since I didn’t have the option for color to help enrich areas of the frame, I had to do it with ONLY lighting. It was very easy to have areas of the frame look shitty & muddy, but it was also easy to over-light them. You don’t need the shadows to necessarily have a lot of light, but you do want some DETAIL there so you can feel the structure of the various elements of the location. You also want to have a nice pattern of areas of light to areas of darkness across the frame to make it look interesting. This all might sound confusing & rather esoteric but I have practical examples here, so I’m not TOTALLY full of shit.
A couple miscellaneous albeit important principles: Light is a lot easier to control when you have a lot of it. It just is. So my goal was to get a shit-ton of level in there, and expose lower,generally speaking. It was also SUPER important to squeeze as much shadow dynamic range out of the Red Epic Dragon’s sensor as possible, so I opted to shoot at 320. This also gives us a nice, clean image that you can add grain to if you want. Knowing I probably wasn’t going to have much input in post, I wanted to shoot as noiseless of an image as possible. Sometimes I like the higher-ISO look on the Dragon but at times it can be a bit much & require some very GPU-intensive noise reduction. I didn’t want any complaints about too much noise, so lower ISO ftw. We had enough light to shoot with an ND 0.3 in the mattebox the whole time. I love shooting with ND in because when a director wants to shoot in an area that I DIDN’T light, I can just take it out, maybe make some minor tweaks, and USUALLY be set pretty quickly. The ND's have to be really good though. Schneider Rhodium ND's rock my socks.
LIGHTING THE MAIN ROOM

There's certain locations you walk in to and you know exactly where you'll put talent. This one was sort of like that. At minimum, I knew the lead singer was going to be in the middle of the main room in front of the cool wooden wall. I thought the other 2 primary band members would be on each side of him, so that's kind of how I lit it. Ultimately they decided to put singer + rhythm guitar up front, lead guitar (not a primary member of the band) seated in the back, and bassist + drummer in the other room.

I didn't get a chance to take a whole lot of quality BTS of the lighting, but you can see some of it in this BTS video the band put up.
Essentially, this is what I did:
Top light: Litemat S4 with Softbox & grid, rigged up in the middle of the room. It wasn't directly top-down, it had a very slight angle to it just to catch a little bit of light in the eyes, which didn't end up happening because of how talent was standing. Skirted with duvetyne on every side, but we used black wrap at the top since the duv would've flopped down & cut off some of the light from hitting talent. But the skirt was 100% essential. Top lights rarely look good if they're spilling all over the place. Before we flagged off the spill, it was killing all our mood in the image.

Backlight: 120D rigged up top with a mini boom. Very low level (25% or so) and some diffusion. This was to give talent just a tiny bit of separation from the darker background. Added some CTO just for the hell of it, in case they ever wanted to use a colored version of the video. The effect of the light is more noticeable when you're 45 degrees off-angle of the light than directly frontal. It has a nice little subtle shine on the skin.


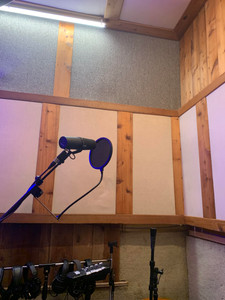
Background: there were 2 recording booths that appears in frame at certain angles, so we tossed up 2 Astera titan tubes in each room so it wouldn't look like a messy blob of darkness. Again, trying to add depth to the shadows.

This dedo light was one of the most important lights we added. We had it hashing across the back wall because it was just way too dark. This gave it some lift, and when combined with the haze, it didn't necessarily look like a hard slash. It sort of blended in with the rest of the lights and seems like a natural falloff.


To the left, notice a couple more lamps we peppered in to light parts of the background. The dedo in the photo on the left is providing a little bit of ambiance on frame left in our master wide, mostly noticeable on the xylophone, which it isn't hitting directly, it's just slightly missing it, but hitting the hazed air and lighting that up. In the photo on the right we have a lowel pro light providing some tiny amount of lift to the right side of frame. These lights are doing VERY subtle things to the image.


LIGHTING THE OTHER ROOM


In this adjacent room, the lighting came about pretty simply. I knew since we were doing black & white, we needed to have SOMETHING coming through the visible window. If I just blacked it out I think it would've looked kinda like dogshit. So I went with the classic hard fresnel thru the window & Venetian blinds, film-noir style. It made the light look pretty epic. To do this, we had to tent the window. My biggest issue with the lighting in this scene is that the light coming from out the window is WAY too low on the stand. It needed to be stemmed-up another 4-5' or so because you can see the bottom of the light source in the frame. To me that looks a little odd seeing how blown out it is at the top of the window. On some of the takes, I asked Jared, the steadicam op to be more eye-level with talent instead of shooting up, because that would help hide the blown-out shittiness a bit. The reason the light was too low was because we were kind of limited with how high our tent was set, given the quantity of material we had to work with. However, if I had the foresight to see that this would be an issue, we would've found a way to get the light higher. It also looks suspiciously dark around the edges of the window. The whole vibe of this shot is a bit more impressionistic in general so I suppose it's not the end of the world, but it might've made sense to have some white in the background and bounce some soft light into it so it could've looked like a proper, yet controlled blown-out window with morning/evening light coming through. Also, if I was grading this, I would've rolled off those highlights a bit more; I think that would've helped big time. Regardless, I think the idea of having hard light thru the window was a good one. We accomplished this with a 300D and a Fresnel 2X in full spot.
For the rest of the space, we had a Litemat 2L centered in the room, up top, providing some ambient room-tone and just overall level to the room. I had my Home Depot-made $200 DIY light as a high backlight onto the drummer, which doesn't register super well, but helps add volume to the room when there's haze present. I use this light ALOT (as chronicled a bit in THIS previous blog post).
The last, and most important piece of the puzzle was getting some nice separation from the background for the bassist because he has dark hair and the background is also dark. So we just tossed up a dedo. My initial plan was to try to separate him from the background a bit more naturally by framing the back of his head into the bright window, but with the positioning of the instruments, I couldn't get a good wide frame, so the hard backlight from the dedo was kind of a last-resort cheat-code and I actually kind of dig it.


From a camera perspective, the biggest issue is that we needed to find a way to connect this space with the main space where the lead singer + guitarists were. So I thought of a cool dramatic mini-oner that follows the lead singer from the window to the microphone as he starts singing. First shot of the piece. But we literally only got like 1.5 takes to do it because the band was really tired and wanted to leave but we wanted the opening shot. So we decided to play it safe with the focus pull and not rack to the guitars and then back to the singer's face at the tail-end of the move, which would've been really freaking dope, but at the end of the day, getting a semi-cool shot is better than not getting the shot at all. We also do a cool 360 thing near the end which I really dug. It helps tie the spaces together. One issue with the video as a whole is that while the beginning and ending have really cool "special" shots, the middle is lacking a bit since it only has the basic coverage. But we were dealing with an understandably tired band so we could only do so much. Overall I think the video was a success considering it came together so last minute. The crew rocked it on this one & helped us be super time efficient, helping us be finished shooting the video in just under 4 hours.
Here's the video one more time in case you don't feel like scrolling all the way back up like me:
Anyways, if anyone actually cares about how I approached the cinematography in this video, I hope this helps or is interesting/insightful in some way. It's hard to cover every single aspect of any shoot in a single blog post as there's so much that goes into it that I didn't cover, like more minute details in lighting but also lensing & camera movement & all that stuff. If you have any questions, comments, or concerns, just let me know!
MK


Really enjoyed reading "Lighting For Black & White", and a few points were immediately actionable for me. This fits well with Calculate Michigan paycheck deductions and net pay in one. I will revisit this post again.
That’s such a classic production story—spontaneity, uncertainty, and then somehow everything magically falls into place. Love that it all came together with such cinematic style. When prepping for unpredictable studio shoots like this, I often trigger blank white screen full screen via WhiteScreen.Vip to test lighting contrasts and simulate ambient bounce off walls or instruments. It’s surprisingly useful for setting tonal mood and checking how monochrome setups handle shadows. Kudos to you for rolling with the chaos—this behind-the-scenes look is raw and real, and WhiteScreen. VIP continues to be my go-to digital light panel in such pinch scenarios.