
Food Cinematography
- Mike Kozlenko
- Oct 14, 2019
- 9 min read
Updated: Mar 23, 2022
How I got somewhat decent "Chef's-Table (ish) kind of footage with like 1% of the budget

A few months back I shot a little :60 promo of chef Leon Brunson in Tallahassee, FL. I shot this with my pal Vy Nguyen, who has his production company based there in North Florida. We went to school together and for years we'd been talking about doing a cool food piece with a similar visual style to Chef's Table because we both love that show. Well in July I happened to be in Florida for another gig and Vy happened to already be doing pre-pro for this job, so we decided to put a crap-ton of production value into this and make it dope. The issue is.... there's not much gear or crew to work with in North Florida. So with a combination of pulling favors and shitty-rigging some stuff, we came up with something solid, given our resources. Here's the final piece (there were also several :15 deliverables for each dish he cooked but this is the main video):
The Approach
We weren't trying to re-invent the wheel with this project. Leon was going to cook 8 or so plates, and ultimately the goal was to make the cooking process & the finished plate look elegant & delicious. Vy was going to cut a montage of the best shots for the main :60 piece and sound-design it. So for me it was purely a visual exercise. We needed visual variety so we grouped certain plates together tonally and came up with a couple different lighting styles and color palettes to play with. In this finished piece you can see how some shots have warm & cool tones mixed in together, some have mainly hard tungsten light, & some are overall cooler & more chrome-like in their palette. We also wanted to pepper in shots of Leon's face so an audience could connect to his level of focus & attention to detail, but we only ended up doing like 3-4 of those. The focus was on the food & the craftsmanship.
The Challenges
There were plenty of these (per usual)
The location was an industrial kitchen with white walls & no windows to motivate light from. Only overhead fluorescents
We needed to shoot 120fps, but at ISO 320 because I wanted the image to be super clean & as noiseless as possible. So we needed a hell of a lot of light.
We didn't have any powerful lamps. The most powerful lamp in Tallahassee is only a 1.2K HMI but it wasn't available
We needed camera movement to give the images life, but we had no access to a dana dolly
Since we needed so much level to shoot at such a high frame rate, I'd be inevitably shooting at a pretty shallow stop, and there's no 1st AC's in Tallahassee or any budget to travel one in from Atlanta, so I'd be pulling my own focus on a 50mm lens and a 100mm macro).
We didn't have much proper grip gear, like 4x frames & flags & diffusion frames & combo stands. We had the minimal amount to get by & we bought cheap alternatives

The Gear
Alright so this is what we ended up getting ahold of thru rentals, stuff Vy owned, & stuff that I had with me in Florida
Red Scarlet-W with 50mm 1.4 Sigma Art & 100mm 2.8 Canon macro
Various camera accessories like follow focus, mattebox, 1/8 BPM, etc.
24" Kessler Pocket-Dolly & a Manfrotto head (rated for 15lb but the camera was like 21lbs)
A few appleboxes
8x ultrabounce
750w Leko
three 250w Lowel Pro lights
one Arri L7-C (not super bright but it's RGB and has some value)
one combo stand (big whoop)
one 2x3 cutter (big whoop as well)
two 300D's, one 120d, two Titan Tubes, three Quasar T8's, one 2' quasar
a couple extra small LED panel lights & some grip knick-knacks
Main Setup 1
All the complaining aside, there were a couple things we had going for us. First of all, we didnt need any wide shots. The focus was on face, food, & hands, so showing the location and the environment wasn't really even relevant. This was the widest shot we had to do:

A 50mm lense makes it easier to hide the imperfections of the location. It also let me get my weak-ass lighting fixtures super close to the edge of frame so I could have a better chance at getting the right levels.
From doing some research and talking to some people about how to approach lighting food, it made me realize it doesn't have to be this entirely different concept of lighting. A very skilled DP told me to just light food like you'd light a person. So this often translated into motivated, soft, & defined key lights, keeping color temperatures naturalistic, adding negative fill, & occasional harder light raking across things in the frame.
In this first setup above, for my keylight, I put Lightdomes on 2 300D's and pushed them through a Bed Bath & Beyond shower curtain that we T-boned with an 8' long piece of PVC pipe. This is our "imaginary" window-light. We still didn't have enough level so we had to add Vy's Aputure LS1 + a softbox behind the diffusion. I added lamp-left & lamp right siders to prevent the light from spilling into the kitchen too much. For the siders, we used some sort of black fabric or black tablecloth (we didn't have proper duvetyne) t-boned with PVC pipe again. I used the black side of the 8x ultrabounce to add negative fill on frame-right. We also used a teaser to make the bottom of the key light a little less punchy on his white shirt.


To wrap the key around a bit more, I just threw up a bare titan tube, and that worked pretty well. It provided a nice bit of output that we needed to fill in some shadows that were a bit too dark.
The background was a little trickier for me to figure out. I needed to have some sort of level coming from the top to fill in the room and provide some ambient, so I had the fellas prop up 2 quasar T8's towards the front and 1 quasar towards the back. These weren't quite bright enough so we used some fog to help carry the light and lift the exposure a bit in the bottom of my waveform, which I needed desperately. I made sure to keep the fog only in the background because I didn't want it polluting and softening the detail on the talent. I was at 5600k on the camera so these tubes gave some soft, neutral-colored volume to the room. In the back area, I shined a couple hard, warm lights directly into the metallic shit to give it some nice color. I initially wanted to mount a light inside the hood above the stove, pointed straight down, but we didn't have anything to rig it with. The fact that our focus is so shallow helps make the lights kind of feel like they're coming from the hood anyway.
As we got closer to rolling, we started adding some spice. We put some colorful veggies on some of the tables and I just fired some hard light into them to lift the exposure. But you can see how controlled the ratios are. These harder sources are hitting very precise areas and they're not bright enough to compete with anything else in the frame, they're just providing a base exposure on certain objects so they don't turn to complete mush on camera. When you're using a lot of lower-powered lamps, it's easy to over-light, and some could argue that I'm over-lighting here, but I think I'm placing these lights in places that make sense and blending all these sources together to create a warm wash of light in the background that feels cohesive to me.
Lastly, we added a 2' quasar wrapped in CTO and placed into the back oven to create some oven-light. This was SO important to add. Imagine if that oven was dark. It would've looked like complete shit. But here it's giving us a really nice highlight in the background. And then I decided to throw up the Arri L7-C and give Leon a warm edge-light, motivated from the oven light. It just barely edges him out and adds some separation and interest to that part of the frame.
These are some of the frame that pretty much had the exact same lighting with some small tweaks here & there:


Main Setup 2
For our 2nd "look", we were going for some harder backlight-y type stuff because the food was more "southern" (like grits, for instance) and we were going to have more steam so the term "heat" was kind of my guiding principle. We still had a soft daylight key on the face and hands but messed with color temperature on the camera and gels on some of the lights in the background.
These were the frames from this setup:


This is what we did:
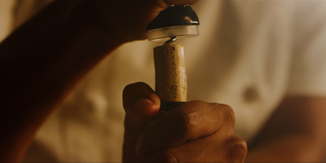
We flipped the key light to the opposite side for visual variety. We also gelled the 300D's with CTO. Then we took the leko that was firing into the background on the previous setup and we used it to instead add a hard backlight on Leon and the food. I added a 1/4 (or was it 1/2?) CTO as well. You can see just how nicely it backlights the steam. Then we kept the Arri L7-C on the same side but we cooled the color temp on it and dimmed it way down (to give the colder edge light you see on his face on camera-right). For some shots, we went totally warm so we dimmed the daylight sources (besides the background quasars) and just went to like 4400k on the camera (like the shot of him popping the cork and holding the bowl of mushrooms)


Main Setup 3
For our 3rd "look", the goal was to have something that felt chrome-like. So it required a mix of various levels of daylight gels.


To change up our lighting to create the different feel we wanted, we took off our edge light on talent & food, and we spun the leko around (the one that was providing a hard warm backlight on Leon) and we put some CTB on it and raked it across the kitchen background tables, from frame-left to frame right. We did something similar with the 120D in the back left corner, pointing it more into the back wall where the stove was, put a fresnel lens on it, and added 1/2 CTB on it as well. This gave us really interesting tones because we were combining a tungsten-corrected source with a LED daylight source that we put additional 1/2 blue on. We shined a couple more lamps onto the background just to fill in some dead-looking areas, and we ended up with a pretty interesting blue tone.

Mixing color temperatures on your lights, even ones that are shining in the same direction, is a great way to get painterly with your frame and infuse some interesting tones. We added a touch of fog, only in the background, to smooth out some of the harshness & reflections we were getting from some of the sources. Having so many hard lights wasn't necessarily the worst thing ever on this shoot because they created interesting highlights on the metallic textures.


Tabletop Setup
No cooking piece is complete without the tabletop food shot. But these things are kind of a pain in the ass to pull off when you have a big camera. It usually requires proper professional equipment that we didn't have. So we used the next best thing: a mirror! We got a mirror from home depot, rigged it up on 2 C-stands, cleaned the heck out of it, and got some really cool tabletop shots.


There's a couple CRUCIAL things to be aware of when you're doing this mirror stuff. First of all, if you're gonna have anything in the frame with text, you'll wanna flip the image in post. Secondly, you have to make sure the mirror is perfectly square to the camera and not leaning one way, because you set your focus to the mirror, so if one side is leaning forward or backward, your focus plane can get really funky. Lastly, the mirror needs to be SUPER clean. You can't have residue from paper towels either. You gotta be very careful with it.


Lighting for these overheads was very similar to what I've been describing. This blog post is already getting kind of long so if you have any questions about these shots specifically I'd be totally down to provide that intel.
I'm pretty proud of how this piece turned out. It also wouldn't have been possible to pull off without all the folks that gave their time to lend a helping hand on a challenging & long, yet fun day. We had folks of varying experience levels on the crew but the vibe was so relaxed and low-key so it was easier to experiment and come up with cool shots. Now, to me the point of the video and this post isn't to imply that you shouldn't get Skypanels and HMI's and a proper 1-ton truck and all the other fancy dancy stuff for your shoots. Those tools would've been SO helpful and would've made this project even better, and quicker, and easier to pull off. But here, I'm just illustrating a way to make the most of some of the parameters and resources you're given and encouraging you to find a way to make it work. I do realize that I spent this whole article complaining about lack of resources when I still had a RED to shoot with and some proper movie lights, but that stuff is all relative. Some DP's would refuse to shoot this kind of gig if they saw the equipment list. With gear, there's always a law of diminishing returns: the $6000 skypanel S60 isn't going to give me 3x better light than two 300D's, around $1000 each.
That's where understanding the principles of lighting comes into play: knowing that a bit of fog in the background can help blend multiple sources together, but making sure to keep it out of the foreground so you're not shooting thru a bunch of fog. Or not just shooting a light bare through a diffusion, but putting a softbox on it first so you're diffusing soft light, to create a really pretty light source. There are just a few of many. Let me know if any of you have some questions about this shoot, it's kind of hard to cover every single detail so I'm sure at least some of it may still be unclear.
MK